Website Logo. Upload to /source/logo.png ; disable in /source/_includes/logo.html

A Coder's Journey

From educator to programmer.

Back to School & Back to Basics: How Everything Really IS an Object in Ruby

When I first started at Flatiron, I believed Ruby was the language of choice because of its simplicity–I might have even gone so far as to call it straightforward. I didn’t yet understand its eloquence–but I could, as a beginninger, tell that very quickly I was stumbling head-first into some pretty serious logic. I liked that it made me immediately feel smart. Like I was a real programmer! And so, for the first part of the course, I missed the heart of the language itself.

The heart. The truth. Ruby is alive: a world of objects, instances of Fixnum and String and Integer, and a thousand other classes upon which to build.

But they are all just objects.

Sandi Metz believes we should get to know our objects. We should talk to them. Ask them what they want, what they yearn for…so today, I start at the very beginning and ask myself: How is everything an object?

For starters, every Ruby object is an instance of some class.

Classes earn their keep by providing two key functions:

  1. Being containers for methods.
  2. Being factories for making instances.

And every class except one has a superclass, someplace that class can turn to when someone calls a methods the class doesn’t understand.

Let’s check it out by creating our very own CoolBeans class.

1
2
3
4
5
6
7
8
9
10
11
12
class CoolBeans
  attr_accessor :beans

  def initialize
    @beans = []
  end

  def count_beans
    @beans.count
  end

end

Just from looking at it, there are four readily apparent methods our class CoolBeans has:

  1. It can initialize a default empty array of beans when a new instance is created
  2. It can count how many beans it has
  3. It can return the object assigned to @beans (through the instance method beans)
  4. It can assign a new object to @beans (through the instance method beans=)

(The third and fourth methods are created through my attr_accessor)

But don’t trust me! Let’s just ask the class what instance methods it has!

First–lets make an instance of the class:

1
2
my_beans = CoolBeans.new
 => #<CoolBeans:0x007fe8abf516d0 @beans=[]> 

This returns an object that is an instance of CoolBeans. Our object variable, @beans,(also known as an instance variable), is set to its default value of an empty array upon initialization.

Second-what class is this object exactly?

1
2
my_beans.class
 => CoolBeans

Okay–so we knew that…but now, we can ask the class of this object, what instance methods it has:

1
2
my_beans.class.instance_methods
 => [:beans, :beans=, :count_beans, :lm, :lim, :nil?, :===, :=~, :!~, :eql?, :hash, :<=>, :class, :singleton_class, :clone, :dup, :itself, :taint, :tainted?, :untaint, :untrust, :untrusted?, :trust, :freeze, :frozen?, :to_s, :inspect, :methods, :singleton_methods, :protected_methods, :private_methods, :public_methods, :instance_variables, :instance_variable_get, :instance_variable_set, :instance_variable_defined?, :remove_instance_variable, :instance_of?, :kind_of?, :is_a?, :tap, :send, :public_send, :respond_to?, :extend, :display, :method, :public_method, :singleton_method, :define_singleton_method, :object_id, :to_enum, :enum_for, :==, :equal?, :!, :!=, :instance_eval, :instance_exec, :__send__, :__id__]

But we don’t even need to go up to the class to know the instance methods because the object itself is an instance and knows its methods:

1
2
 my_beans = CoolBeans.new.methods
 => [:beans, :beans=, :count_beans, :lm, :lim, :nil?, :===, :=~, :!~, :eql?, :hash, :<=>, :class, :singleton_class, :clone, :dup, :itself, :taint, :tainted?, :untaint, :untrust, :untrusted?, :trust, :freeze, :frozen?, :to_s, :inspect, :methods, :singleton_methods, :protected_methods, :private_methods, :public_methods, :instance_variables, :instance_variable_get, :instance_variable_set, :instance_variable_defined?, :remove_instance_variable, :instance_of?, :kind_of?, :is_a?, :tap, :send, :public_send, :respond_to?, :extend, :display, :method, :public_method, :singleton_method, :define_singleton_method, :object_id, :to_enum, :enum_for, :==, :equal?, :!, :!=, :instance_eval, :instance_exec, :__send__, :__id__]

Wait a hot sec. I thought this class only had 4 instance methods? The ones listed earlier! So what exacty is happening here?

In Ruby if you can reference something with a variable–it’s an object, and virtually all Ruby objects can trace their ancestry back to a Basic Object.

1
2
3
4
5
6
 my_beans.class #find the class of the object my_beans
 => CoolBeans
my_beans.class.superclass #find the superclass of my_beans
 => Object
my_beans.class.superclass.superclass #finds the base class of almost everything in Ruby
 => BasicObject

Hence, almost everything in Ruby is an object–which works out quite conveniently for us, because everything being an object and such, Ruby has given us a shared set of methods all objects have in common, re: the extra 50 or so instance methods available to the class that are not written in the code itself, but rather inherited.

Here are some common methods all objects have–and you should know them if for no other reason than to stay out of their way šŸ˜Ž.

1
2
3
4
5
instance_of?
to_s
public_methods
instance_variables
send

But one last thing! Where did our initialize method go? Why wasn’t it listed in my instance methods?

That is because instance_methods returns an array of public and protected methods. However, initialize is always private. To see it, we would have to do the following:

1
2
my_beans.class.private_instance_methods
 => [:initialize, :default_src_encoding, :irb_binding, :initialize_copy, :initialize_dup, :initialize_clone, :sprintf, :format, :Integer, :Float, :String, :Array, :Hash, :warn, :raise, :fail, :global_variables, :__method__, :__callee__, :__dir__, :eval, :local_variables, :iterator?, :block_given?, :catch, :throw, :loop, :respond_to_missing?, :trace_var, :untrace_var, :at_exit, :syscall, :open, :printf, :print, :putc, :puts, :gets, :readline, :select, :readlines, :`, :p, :test, :srand, :rand, :trap, :load, :require, :require_relative, :autoload, :autoload?, :proc, :lambda, :binding, :caller, :caller_locations, :exec, :fork, :exit!, :system, :spawn, :sleep, :exit, :abort, :Rational, :Complex, :set_trace_func, :gem, :gem_original_require, :singleton_method_added, :singleton_method_removed, :singleton_method_undefined, :method_missing]

And there you have it. Front and center.

Cool beans.

Everything Is a Delicate Balance Between Space and Time: The Poetic Nature of Linked Lists

Linked lists are not an all purpose tool. In fact, the first time you play with a linked list will probably be to help develop your conceptual understanding of computer science theories. But you already, undoubtedly know a little bit about their functionality through other ruby data structures.

A linked list is a data structure used to sort and organize data. A linked list is similar to an array: it stores data at a particular value. However, it differs as each element in a linked list (called a node), has knowledge of the node that comes after it. You can think of a node object like this:

A node object contains the node itself as well as a pointer to the object that follows it (The link in linked list!). It therefore takes up more memory than an array. Here is what the node object looks like in ruby:

1
2
3
4
5
6
7
8
9
class Node
  attr_accessor :data, :pointer

  def initialize(data, pointer = nil)
    @data = data
    @pointer = pointer
  end

end

When the node is initialized, it has data as well as a pointer to the next node (this can be set to nil, if the proceeding node does not exist or is itself a nil value).

Now lets get in the console and play!

1
2
3
4
5
node_1 = Node.new("Hiya Buddy!")
 => #<Node:0x007fd1931b6f18 @data="Hiya Buddy!", @pointer=nil>  

node_2 = Node.new("Right Back Atcha!")
 => #<Node:0x007fd193184ea0 @data="Right Back Atcha!", @pointer=nil> 

We have two nodes, but both node_1’s pointer and node_2’s pointer’s are nil. In order for them to be connected to create the beginning of a linked list we need to set node_1’s pointer to node_2 as such:

1
2
3
4
 node_1.pointer = node_2

 node_1
  => #<Node:0x007fd1931b6f18 @data="Hiya Buddy!", @pointer=#<Node:0x007fd193184ea0 @data="Right back atcha!", @pointer=nil>> 

Now we can see that the object node_1 has knowledge of the node_2 object. This is the beginning of a linked list. You will commonly see the next method, used in place of a pointer. However, because next is a key word in ruby, we can’t initialize it in the node object–yet keep calm, we can alias the method as so:

1
2
3
4
5
6
7
8
9
10
class Node
  attr_accessor :data, :pointer
  alias_method :next, :pointer

  def initialize(data, pointer = nil)
    @data = data
    @pointer = pointer
  end

end

This will allow us to call the next method through the node object itself. Therefore if I want to call the node_2 object. I can do it as such:

1
2
node_1.next
 => #<Node:0x007fd192b4efb8 @data="Right Back atcha!", @pointer=nil> 

In a singly linked list there is a head, which represents the beginning of a linked list. To create this relationship, we will need a new object, our Linked List object, composed of our node objects.

1
2
3
4
5
6
7
class LinkedList
  attr_accessor :head, :data, :pointer

  def initialize(data)
    @head = Node.new(data, pointer)
  end
end

Here we have our very own linked list, we can begin to add methods to–for example, we can create a method to store data at the beginning of our linked list:

lets say we have the following linked list that looked like this:

1
a -> b -> c

To insert the string “the abc’s” into the 0 index, we would need to first create a new node object with the data “the abc’s” and set our new node object’s pointer to a, the current head of our linked list.

This would give us:

1
"the abc's" -> a -> b -> c

That said, the method should look like this:

1
2
3
4
5
  def unshift(data)
    new_node = Node.new(data) #first we create a new node
    new_node.pointer = @head #we set the pointer to the head (a) of our linked list
    @head = new_node #our new node become the new head, still pointing to (a) 
  end

This adds a node object at the beginning of our linked list by first creating a new node object, and then setting it’s pointer to the current head object (the first object in the list).

Now, what if we wanted to insert a value in the center of our linked list?

Say we want our linked list to look as such:

1
"the abc's" --> a --> b --> "psych!" --> c

To insert “psych” into the third index, we would have to move to the second index to get b, create a new node, “psych!”, set b’s pointer to “psych” and then set the pointer of our new node to c.

Our new code would look like this!

1
2
3
4
5
6
7
8
9
10
11
12
13
14
15
16
17
18
def insert_at_index(index, value)
  current = head

    (index - 1).times do
      if current.pointer == nil
        next_node = Node.new(nil, nil)
        next_node.pointer = current.pointer
        current.pointer = next_node
      end
      current = current.next
    end
  end
  new_node = Node.new(value) #new node "psych!"
  if current.pointer != nil
    new_node.pointer = current.pointer #"psych!"'s next node is b's next, c
  end
    current.pointer = new_node #b's next is "psych"
end

Please note, that this method will not work if you want to insert a new note at the beginning of the linked list, for this your user should be directed to the unshift method.

Now, onto the bigger questions: Why would we want to use a linked list instead of an Array?

Well, lets compare using a chart:

array vs. linked list

And there you have it. The hows and whys of linked lists. Good luck on your next and all future interviews!

Object = 'What We Talk About When We Talk About Third Party API's'.new

I ended my last post stating you should wrap your desired API’s methods in your own instance methods. While this is true, I left out the whole why of it all. How dare I!

Allow me, to give you a hint…

You see, everything, and I do mean EVERYTHING(!) in Ruby is an object, including our dear complicated API’s.

Without further ado, I’d like to introduce you to my API object:

1
2
3
4
5
require 'open-uri'

class InstagramWrapper

end

You may have noticed that I required open-uri. Using this is an easy-to-use wrapper for net/http, net/https, and net/ftp, and is included in the ruby standard library, meaning, if you are in a rails app, you do not need to require open-uri.

Now, because we are dealing with the instagram API call, itself–as an object–we need to initialize it and that means, we need to ask ourselves some seriously existential questions.

This is not a pipe

What makes an API call an API call?

…or, in less abstract terms, what exactly does an API call need to be an API call?

This depends on what kind of API call you are making.

If you want to make a call on behalf of a user, chances are, you will need to use OAuth, to get permission to user the user’s specific id. If you just want to get the result for a certian tag search or really, anything unrelated to a specific user, you will more than likely, not need the user to authorize, your application. For the purposes of this tutorial, let’s say you just want to get all the instagrams for a specific tag search.

To bring our API call to life we need to initialize the client_id (a key you get by registering your application with instagram).

1
2
3
4
5
6
7
8
class InstagramWrapper
  attr_accessor :client

  def initialize
    @client = Instagram.client(:client_id => ENV["INSTAGRAM_CLIENT_ID"])
  end

end

Now you can go into your rails console and type:

1
playing_with_my_new_api_class = InstagramWrapper.new

Which will return the InstagramWrapper object, the API call itself. Don’t be shy. Ask what methods are available to you:

1
playing.methods

And the first one is client. Keep asking questions (They keep you young at heart ā¤ļø ).

1
playing.client.methods

And there it is!!!! tag_search(!!!!). Just do it.

1
playing.client.tag_search("everythingsanobject")

One smart cookie has tagged this. Neat-o. Lets add this method to our Instagram API object.

1
2
3
4
5
6
7
8
9
10
11
class InstagramWrapper
  attr_accessor :client

  def initialize
    @client = Instagram.client(:client_id => ENV["INSTAGRAM_CLIENT_ID"])
  end

  def number_of_tags(tag)
    client.tag_search(tag)
  end
end

And there you have it. Your very own, fully functional API object tightly wrapped in a InstagramWrapper class.

Present

You’re welcome.

What We Talk About When We Talk About Third Party API's

Great Gatsby

ā€œThey were careless people, Tom and Daisy- they smashed up things and creatures and then retreated back into their money or their vast carelessness or whatever it was that kept them together, and let other people clean up the mess they had made.ā€ –F. Scott Fitgerald

If there was a metaphorical representation of a third party API, Leo would be it.

Undoubtedly.

The Great Gatsby. Eternally eloquent, dazzling, sparkling, but somehow you can’t help but feel that you were handed a big broken, mess, you need to JSON your way out of!

APIs aren’t exactly “messy” so to speak, in fact, they are quite the opposite, a careful, calculated way to access an Application Programming Interface’s data–yet to someone interacting with an API for the first time, you can’t help but be a bit messy, “careless” so to speak–in fact, it’s completely necessary to understand how your API is working.

This blog will attempt to give you the tools to wrecklessly and glamorously parse APIs. Before you know it, you’ll be flying over the Queensboro bridge, all of New York City in your view as you glide slowly but stylishly (cause you’re in a hot car with a 12 cylinder engine šŸ˜Ž) headfirst into the city that never sleeps.

Cool Car

First, it sounds obvious, but at times, we all need the obvious pointed out to us with exclamation marks!!!!!!! and –>arrows<–. LOUD AND CLEAR. Making an API call is simply accessing the correct URL for your desired data (well… you are also scraping the JSON located at a SPECIFIC website, but this is a good starting understanding.)

Now, look up at the top of the screen. RIGHT NOW! The url you are currently at is “http://beccaades.github.io/what-we-talk-about-when-we-talk-about-third-party-apis”. This is where you come on the internet to read my blog about API’s!

Now for THE RULES:

1st RULE OF API’s: READ THE DOCUMENTATION.

The latest API I used, instagram, includes a developer page. It tells you all the different endpoints you will need to access their data, and you can get to playing immediately, by placing the different queries in your browser.

This is what they give you:

1
https://api.instagram.com/v1/locations/search?lat=48.858844&lng=2.294351&access_token=ACCESS-TOKEN

This is what you do:

1
https://api.instagram.com/v1/locations/search?lat=40.7577&lng=-73.9857&access_token=ACCESS-TOKEN

And this is what you get:

1
2
3
4
5
6
7
8
9
10
11
12
13
14
15
16
17
18
19
20
21
22
23
24
25
26
27
28
29
{
meta: {
code: 200
},
data: [
{
latitude: 40.757696,
id: "5106788",
longitude: -73.985716,
name: "Swatch"
},
{
latitude: 40.75770595,
id: "877266653",
longitude: -73.985676,
name: "Espn - Abc Studio Times Square"
},
{
latitude: 40.7576833,
id: "5012142",
longitude: -73.9857171,
name: "Times Square"
},
{
latitude: 40.757692657,
id: "242689896",
longitude: -73.985731602,
name: "Black Bar & Loungue"
},

(SIDENOTE: Please don’t be a dummy and know that you will have to actually replace the access token with your own.)

To access this information you can treat the JSON like a hash. Let’s say we set this equal to the variable data_hash. If I wanted to access “Swatch,” I could enter data_hash[:data][0][:name]and it would return “Swatch” back to me.

2nd RULE OF API’s: PLAY!!

Now. Listen close. I have a little gem to share with you. The httpary gem to be exact.

This gem lets you get down to business quickly by simply requiring it and then gaining direct access to JSON in the API to your app, to gain both familiarity and explore potential methods for your classes.

To use the httparty gem you simply require it in your gem file. Then in your model, your require the gem like so:

1
2
3
4
5
6
7
class InstagramWrapper

  require 'httparty'

  response = HTTPARTY.get("https://api.instagram.com/v1/media/search?lat=40.7577&lng=73.9857&distance=1000&access_token=access_token")

end

You can then begin by binding into the respond and deciding what information you need and begin to structure your methods.

3rd RULE OF API’s: ASK THE API’s WHAT METHODS THEY HAVE

Once you are able to access the JSON, don’t be afraid to ask the API exactly what methods they have! They may just tickle your fancy with some extra methods that they don’t discuss in the documentation. For example, the only way, I was able to learn about instagram’s nifty tag_count feature was through directly asking instagram what methods they have (rails console, baby!) and I got this quite lovely response (amongy MANY many others).

1
2
3
=> [:client,
 :get_count_for_tag,
 :get_tourist_instagrams

I simply did this by entering the following into my console:

1
2
tell_me_the_methods_baby = InstagramWrapper.new
tell_me_the_methods_baby.methods?

How wonderfully convenient.

4th RULE OF API’s: WRAP THE API’S METHODS IN YOUR OWN INSTANCE METHODS

Once you have found the desired method, it is time to wrap it in an instance method. For example the instagram tag count method could be wrapped as such:

1
2
3
4
  def get_count_for_tag(tag)
    results = client.tag_search(tag)
    results.collect {|result| result["media_count"]}.first
  end

Results for the tag “HTTparty” gives you back :

1
=> 8.0

Sad toast.

The people of instagram are definitely missing out.

And there you have it. A step by step guide to deconstruct the many faces third party API’s may bring us. Cheers to that!

Stalk Much?...Cause Rails Does! A Tale of One Sessions' Session

This may not be the most interesting of all stories, but it's one that need to be told. That begs to be heard. And here is me, giving this story it's very own particular voice (and thick-framed glasses!). So lets start at the beginning (alas, where most programming stories tend to start), and see if we can't make it through to the other side. Won't you, my dear reader, come on this jaunt with me?

Once upon a time

We commence our journey in the darkest of crevices, a most important file hidden deep inside the config directory: route.rb. Here we need to establish a root directory, and hatch our grandiose session plans.

1
2
3
4
5
6
  root 'posts#index'

  resources :sessions, only: [:create, :new, :destoy]
  get '/signup', to: 'users#new'
  get '/logout', to: 'sessions#destroy'
  get '/login', to: 'sessions#new'

We use the resources key word to add seven routes to our web application and quickly narrow these routes down to just the ones we need via the syntax ‘:only’. To keep things clear, for both us and our user, we will name these routes as ‘signup’, ‘logout’, and ‘login’ respectively. We do not play with metaphors here. Literal is best. Now, we have a sessions directory, and we can begin building our sessions conroller. To do this, we type the following into our terminal:

1
rails g controller sessions

This will give us a controller, and while we are here–lets fill out the actions to match our routes:

1
2
3
4
5
6
7
8
  def new
  end

  def create
  end

  def destroy
  end

Here we go!

Luigi

In order for our sessions hash to function, we need our user to be validated on the home page before visiting any other views. Thus ensues the process of validating and logging in a user. Yet, it is a bit more complicated than that for us programmatically. This involves creating a method we can access from any view on our website. For this we need to go to that forbidden place, we have yet to explore. The application controller.

1
2
3
4
5
6
7
8
9
10
11
12
13
14
15
16
17
18
19
20
21
22
23
24
25
26
27
28
29
30
31
32
  class ApplicationController < ActionController::Base
  # Prevent CSRF attacks by raising an exception.
  # For APIs, you may want to use :null_session instead.
  protect_from_forgery with: :exception
  before_action :login_required

  #This method checks if we have a user signed in
  def login_required
    if !logged_in?
      redirect_to login_path, :notice => "Log in to edit or delete your post"
    end
  end

  def logged_in?
    !!current_user
  end

  helper_method :logged_in?

  #This method gives us details about our user
  def current_user
    if session[:user_id]
      @current_user = User.find(session[:user_id])
      @current_user
    else
      false
    end
  end

  helper_method :current_user

  end

These two helper methods, current_user and logged_in? will allow us to access data pertaining to our user regardless of the variables passed in through our controllers. We will be able to access them from anywhere in our views! And do notice the macro 'before_action :login_required,'--this makes it mandatory for a user to be logged in before accessing our But please, let's not get ahead of ourselves. Before we get to our views, we need to make a pit stop at our post controller to make sure it has access to all the necessary information. Most notably, that we allow a user to visit our home page, or more specifically, posts#index:

1
2
class PostsController < ApplicationController
  skip_before_action :login_required, :only => [:index]

This macro does exactly what is says it does (dontcha just love rails?), it allows only the index page of our posts controller to be visible to a user without first logging in (hence the skip_before_action --get it?!).

So now, finally, we are ready to enter the holy view!!!!

The Holy Grail

Now one might think, we should go to our post index page. However, that individual would be WRONG. Because we, programmers, are planners. And we want our user to be able to logout no matter what page they are on. I mean, really, sessions wants to be AVAILABLE, people!!! This means that not only are we going to go into that cute little layouts directory, but also we will be rendering a header from the application.html.erb file.

Rendering a partial is super easy, you simply do this within the body of your application.html.erb.

1
<%= render 'layouts/header' %>

Followed by the creation of "_header.html.erb"

Now, we are embarking on the climax of our tale. The header partial:

1
2
3
4
5
6
<% if logged_in? %>
Hiya, <%= current_user.name %>! You're looking mighty fine today!
<%=link_to "Log Out", logout_path %>
  <% else %>
<%= link_to "Log In", login_path %>
  <% end %>

This allows the user to loggout from every page in our web application, not to mention, a sweet, homey greeting šŸ˜Ž.

But we still have one problem. How does our session know who our user is? For this, we will come full circle and revisit our sessions controller.

1
2
3
4
5
6
7
8
9
10
11
12
13
14
15
16
17
18
19
20
21
22
23
24
25
26
27
28
class SessionsController < ApplicationController
  skip_before_action :login_required, :only => [:new, :create]

  def new
    @user = User.new
  end

  def create
    user = User.find_by_email(params[:email])
      if user && user.authenticate(params[:password])
        session[:user_id] = user.id
        redirect_to root_path, :notice => "Welcome back, #{user.email}"
      else
        flash.now.alert = "Invalid email or password"
        render "new"
      end
  end

  def destroy
    session[:user_id] = nil
    redirect_to root_path
  end

  private
    def login(user)
      session[:user_id] = nil
    end
end

Like all good tales, there was one quiet character hiding, softly apart from the rest. The user.id. And like a wise old woman, who knows all, but is soft spoken, she hid away in the sessions create action. Yet without this one line of code "session[:user_id] = user.id", our entire sessions hash would break and fall apart. It's the link between the two controllers, between our database and our models, and also, the link between our application, and our user.

And that my friends, is how you create sessions in rails. Stalking complete. Story Over.

That's not all!

!!!!SPECIAL NOTE YOU MUST READ!!!! Please add the following to your gem file:

1
gem 'bcrypt'

This will enable encription of passwords. You will also need to rename the password column in your user's table schema to "password_digest". Rails does the rest. Can you say MAGIC?!?!?!!

Now, for reals!

That's all folks

Blog Post #3 or... "What I Did Over My Summer Vacation!"

I love Sinatra.

I love the interactivity.

I love the creativity. How you can create a web application, and BAM it is there. Tangible.

So close you can almost touch it.

So close you can click on it.

But I wanted to take it further. I wanted it to look stylized. CSS stylized. So this weekend (my fourth of July summer break!) I set about to accomplish the possible.

I found all this and more on Singing with Sinatra, a website designed specifically to give beginner Ruby programmers an introduction to Sinatra. Through this three part web series, I was able to supplement my understanding of Sinatra, and complete a fully realized web app for a simple to-do list. And of course, no web app would be complete without the appropriate styling.

CSS styling to be specific.

To start, I added an erb page at the root of my views directory for the layout:

1
2
3
4
5
6
7
8
9
10
11
12
13
14
15
16
17
18
19
20
21
22
23
24
25
<!doctype html>
<html lang="en">
<head>
  <meta charset="utf8">
  <title><%= @title + ' | Recall' %></title>
  <link href='/reset.css' rel='stylesheet'>
  <link href='/style.css' rel='stylesheet'>
</head>
<body>
  <header>
    <hgroup>
      <h1><a href="/">Recall</a><h1>
      <h2>'cause you're too busy to remember</h2>
    </hgroup>
  </header>

  <div id="main">
    <%= yield %>
  </div>

  <footer>
    <p><small>An app for <a href="http://net.tutsplus.com">Nettuts+</a>.</small></p>
  </footer>
</body>
</html>

How does this connect to my other ruby pages you may wonder? Yield, my friend. Literally, yield.

You see the div id with the tag of “main”?

Right here:

1
2
3
  <div id="main">
    <%= yield %>
  </div>

This allows the routes (view pages) to be passed in through a block, while also utilizing the id selector to streamline the content stylistically of each and every page my heart desires.

Another nifty trick, I was looking for was the inclusion of css stylesheets. Through linking to them in my layout page, I was able to universally style my web recall app.

I was introduce to something else as well. Let me show you:

1
2
  <link href='/reset.css' rel='stylesheet'>
  <link href='/style.css' rel='stylesheet'>

Do you see it? The reset–right before the css stylesheet. That was all new to me. So I researched…

Researching

…Basically every web browser uses a base stylesheet which somewhat ensures that HTML is rendered reasonably well when custom CSS is not provided. Unfortunately, each browser uses a different base, and thus enters CSS resets. A way to strip styles so your elements are rendered consistently across a multitude of browsers.

One developer, Craig Buckler opposes CSS resets quite simply because he resents the very idea that “pixel perfect” rendering is actually an achievable goal. Instead he opts for a simple css reset of:

1
  * {padding: 0; margin: 0;}

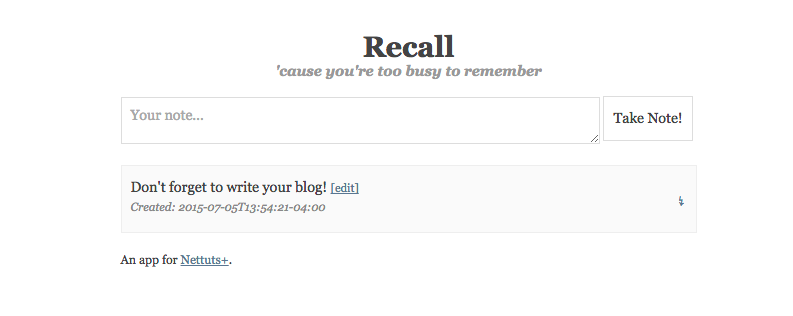
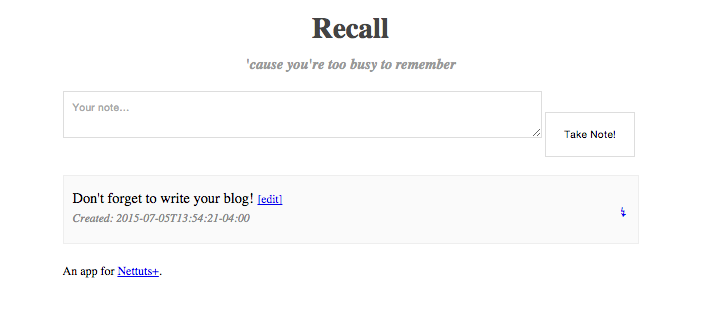
So like any budding developer–I tested it out. You remember the homepage of my web app I showed you at the beginning? (Just scroll up if it’s not PIXEL PERFECT in your mind šŸ˜Ž). Drumroll please or desperate scream–after all we are about to strip my app of its magic!

To reset or not reset? The decision is yours.

"EXCUSE ME!!! My Computer Broke!"

There she goes. Again.

#Shocking

It's always MY fault. Like there's some sort of magic fairy dust sprinkled on everyone else's computer except *hers*. She even got an instructor to help her this time. Wow. They are going to be in for a tasty treat--look what she put in!

1
2
3
evil_pokemons.each do |pokemons|
Pretty Please scrape the pokemons for me!!!!!
end

Please. Tell me she's joking.

Oh Wait, Shhhh. This is going to be good! She was just asked if she read the Nokogiri tutorial. SAY WHAT???? She DID? She was on that website for .56 seconds. #FACTS. (PLEASE!!! JUST OPEN MY PAGES AND I WILL SPILL ALL! NO SNITCHES GET STICHES FOR ME!!!).

Deep breaths. Let's turn on this fan. Look, I mean, had she read it, she would've seen it's all really quite simple. You just give me a few, quick, straightforward commands at the top of your page, and I make like a shepherd and flock!

1
2
require 'nokogiri'
require 'open-uri'

You can even put these commands into irb to play around with, and I will set up your ENTIRE environment perfectly (just make sure I return "true" after each command).

Next, kindly let me know what language you would like to use (I'm very versatile), and for heaven's sake don't be lazy, name your document something fun--'doc' is just so uneventful.

1
2
html = open('website').read
doc_name = Nokogiri::HTML(html)

Now, you are at the part where you get to chillax. Open up your browser by right clicking in crome on inspect element, and you should be able to use the nifty magnifying glass to help you locate any element's css selector you would like on the page.

Once you've found the css selector of your desired element-try it out-I mean, you wouldn't buy a car without test driving it first, why should scraping be any different? Feel free to use binding.pry, a simple puts command, or the beautiful world of irb!

1
2
variable_doc.search(" ").text
variable_doc.css(" ").text

.search and .css mean the same thing, so don't cry your pretty little eyes out about that! Once you've successfully matched the css selector to your element you are good to go and can head right back to your ruby program. Adding .text at the end returns--you guessed it--the text that your css selector selected! I will take care of all the rest (like I ALWAYS do šŸ˜˜).

Jimmy Jet and His TV Set

The Beginning

You woke up one day and realized you were ready to try something new. Do something different. You had taught for nine years: three countries, five schools, all ages, and (luckily!) you loved it. You were absolutely happy. You loved the purpose it gave you. The connections you made. The unbridled energy of Every. Single. Day. You were never bored. Never.

Until one day, it just didnā€™t work anymore. And you werenā€™t sure exactly why. You wished you had the answer, because then, maybe, you could have fixed it. It became harder and harder to keep at something, when the spark was gone. Maybe it was all the testing. Maybe it was the lack of services. Maybe it was the bureaucracy. You canā€™t quite say…but it was time for something new.

You remember hearing that the average person switches their career 7 times, and here you were 31, and still doing the same thing? Maybe it was all just an expiration date after all! You remember learning about Steph, how she went to Flatiron, and was now working full time. Wait. You said. She just went to school for three months and now has a job? Yes. WAIT. For reals? AND she LOVES it.

You talked to people. One girl had left an office job for a start up. Her biggest regret was that her employers didnā€™t fire her so she could collect unemployment. She told you to begin at codeacademy. You did. You felt like you were back in fifth grade when every morning began with a multiplication times tables. Every student had 1 minute complete the questions, and if you got them all right, you got a sticker, and the next day you moved on to the next number. You loved the certificates. The emails congratulating you. And you loved coding!

You took a class, you applied to some programs, you coded, and miraculously, you got into Flatiron! You were so happy(cartwheels(!) and cartwheels(!))! You had a new future. Something exciting. Bright. And last week, you began. You coded all week. You learned how much you didnā€™t know. You got help. You stayed up too late, and finally, you managed to answer some of your own questions. The error messages slowly made a little more sense. And thatā€™s where you are. At the beginning.

I lied.

I said one day I woke up and wanted to try something new. It didnā€™t happen like that. It was a process.

There is no ready. set. go. Itā€™s not a gunshot and then you go off running into the distance like an antelope tearing up a glorious African sunset. Itā€™s a Sunday long run, slow footstep after slow footstep, building up the miles, so that one day, when that shot is fired, you will at the absolute least, know you prepared the very best you could.